EventTrak Configuration for Controlling Relay
- Jane
I have a remote IntelliBox unit and would like control its relay. How would I go about this?
Below is the method to set this up.
Summary:
We will control the status of the relay by sending a ASCII string to the second serial port of the IntelliBox unit using Ip-socket connection 192.254.1.110:10002.
The entire EventTrak configuration setup is done from the IntelliBox web manager. Log in to the unit via a web browser typing in its IP address in the address bar of a web browser.
Example: 192.254.1.110
A summary of the process that goes on inside IntelliBox unit is described below.
The IntelliBox unit will need to use a serial port with a loopback connector on it to make this EventTrak work:
- The IntelliBox will send the message out the designated serial port and through the loopback back into itself.
- An EventTrak configuration setup on the slave IntelliBox is running to monitor the match string "Trigger" to activate the relay.
An EventTrak configuration setup on the slave IntelliBox is running to monitor the match string "Reset" to deactivate the relay
Once the IntelliBox device server is configured, other IntelliBoxes can be configured by importing .xml files extracted from previously configured IntelliBox units.
In the web manager, click on:
- XML Link on the Left Menu
- Then Import configuration link
- Select 'Configuration from External file'
- Click 'Browse' and locate the XML file to import. Click 'Import' to load into the IntelliBox.
- Click Submit
Directions for initial setup without the XML
A loopback connection needs to be placed on the serial channel 2 port of the IntelliBoxes. (See screen shot below) To do this, place a jumper wire, connecting Tx- to Rx - and Tx+ to Rx+.
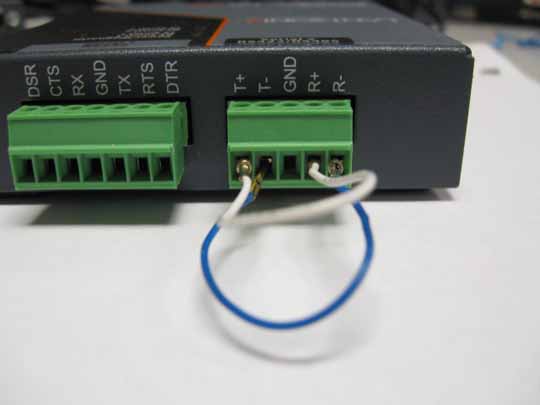
Line 2 needs to be set up this way on each unit (We are using the 2nd serial port as it is only RS-485. This leaves port 1 available as a console port or for a device connection)
- Click on Line on the left menu
- Select Line 2 link
- Click Configuration
In the Configuration menu, use the following settings (see illustration):
Interface: RS485 Full-Duplex (RS485-4wire) - to allow loopback connection on port
- State: Enabled
- Protocol: Tunnel
- Baud Rate: 9600, no Parity, 8 Data Bits, 1 Stop Bit No, Flow Control

EventTrak Configuration:
The unit will have the EventTrak configured to trigger the Relay
EventTrak Control Configuration:
- Click on EventTrak on the left menu.
- Click on EventTrak 2 link.
- Select Control, then Task 1
- Set Activity to Relay from drop-down box.
- Set Output Control to Exclusive (default setting)
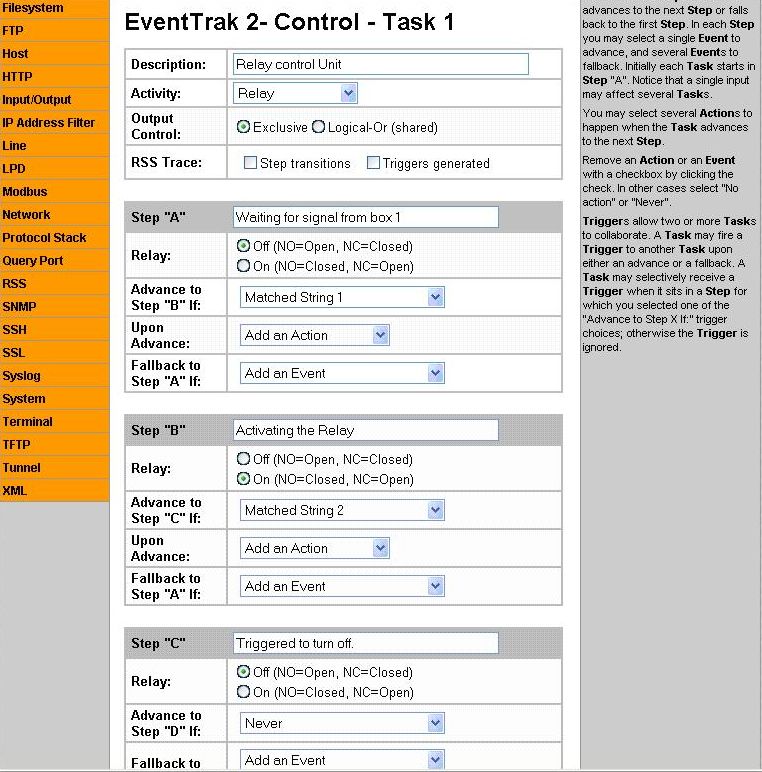
In Step "A"
- Enter Description: "Waiting for signal from box 1" (optional, but recommended)
- Select Relay = OFF (NO = Open, NC = Closed)
- For Advance to step "B" if:, select Matched String 1 from the drop-down box.
In Step "B"
- Enter Description: "Activating the Relay" (optional, but recommended)
- Select Relay: ON (NO = Closed, NC = Open)
- For Advance to step "C" if:, select Matched String 2 from the drop-down box
In Step "C"
- Enter Description: "Triggered to turn off" (optional, but recommended)
- Relay: OFF (NO = Open, NC = Closed)
- Set Advance to step "D" if: to Never
- Click Submit
EventTrak Monitoring Match 1
- Click on EventTrak on the left menu
- Click on EventTrak 2 link
- Select Monitoring, then Match 1
- For Match string field, enter the word "Trigger".
- Mode = Text, Case Sensitive = No
- Click Submit

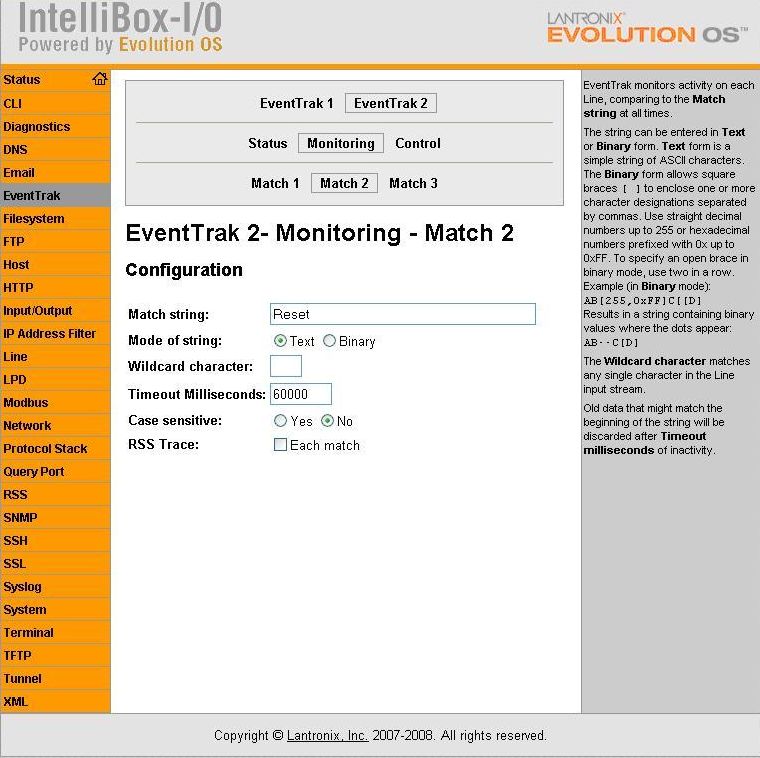
EventTrak Monitoring Match 2
- Click on EventTrak on the left menu.
- Click on EventTrak 2 link.
- Select Monitoring, then Match 2.
- For Match string field, enter the word "Reset".
- Mode = Text, Case Sensitive = No.
- Click Submit.
Testing the EventTrak
Download the Hercules SETUP client from the page below and install it on a Windows PC:
http://www.hw-group.com/products/hercules/index_en.html
Choose the TCP client and configure it to connect to the IP address of the IntelliBox and port 10002
In the "Send" section, type Trigger into one of the fields and Reset into another field:
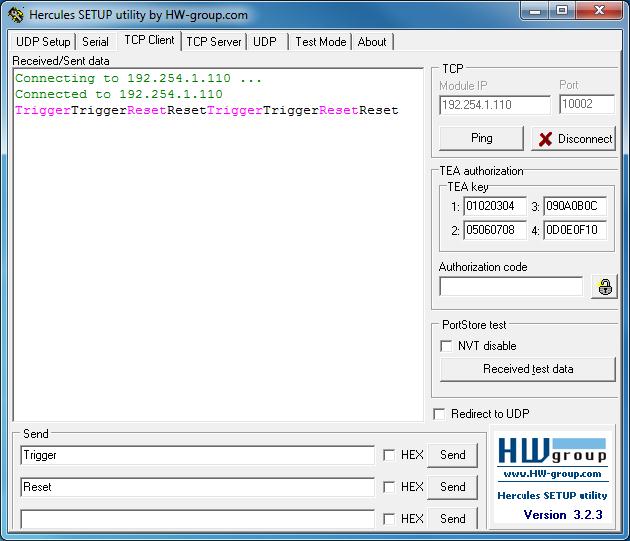
Sending Trigger will close the relay contact.
Sending Reset will open the relay contact.
[Originally Published On: 09/19/2012 03:01 PM]