Step-by-step SLC and SLB configuration
- Jane
What are the steps to configuring an SLC or SLB for use with my equipment's serial console ports?
How to configure an SLC
Useful documentation to download:
Quick Start Guide and User Guide of the SLC8K: http://www.lantronix.com/products/lantronix-slc-8000/#tab-docs-downloads
Quick Start Guide and User Guide of the SLB: http://www.lantronix.com/products/lantronix-slb/#tab-docs-downloads
I. Verify the wiring of cables used between the SLC and the devices
The SLC uses conventional straight-through Category 5 fully pinned network cables for all connections when used with Lantronix adapters. These cables and adapters in various lengths are available from Lantronix.
In order to verify a cable wiring you must know the attached device pinout. Commonly used adapters are listed below.
C: Adapters and Pinouts
- RJ45 Receptacle to DB25M DCE Adapter for the SLC (PN 200.2066A)
- RJ45 Receptacle to DB25F DCE Adapter for the SLC (PN 200.2067A)
- RJ45 Receptacle to DB9M DCE Adapter for the SLC (PN 200.2069A)
- RJ45 Receptacle to DB9F DCE Adapter for the SLC (PN 200.2070A)
- RJ45 to RJ45 Adapter for Netra/Sun/Cisco and SLP (PNs 200.2225 and ADP010104-01)
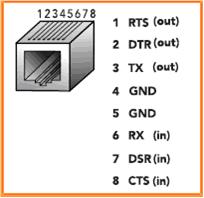
SLC serial ports pinout :
II. General IP Configuration
- Set back factory default settings via web interface or front panel if necessary. See pages 27, 216-218 of the User Guide.
- Follow Quick Start Guide from page 5 to 7 for general IP configuration
III. Specific configuration
- Choose the type of configuration you want:
For a detailed explanation see the User Guide chapter 11: ‘Connections’.
A. Terminal Server
B. Reverse Terminal Server
C. Remote Access Server (RAS)
D. Multiport Device Server
E. Console Server
- Follow the instructions below corresponding to your configuration for connection types A-D
A. Terminal Server
B. Reverse Terminal Server
C. Remote Access Server (RAS)
D. Multiport Device Server
1. Services configuration
- In the Web interface, on the Service page, enable or disable SSH and Telnet logins.
- To save, click Apply.
2. Device port configuration (for all used serial ports)
- In the Web interface, on the Device Ports page, select a port where a device is attached and click the ‘configure’ button
- Enable access to this port through raw TCP connection
- On the port settings page, choose the appropriate values for the Data Settings according to the device attached on this port.
- To save, click Apply.
3. Connection Configuration (for all used serial ports if a connection needs to be use)
For more details on connection feature purpose please see the User Guide chapter 9: ‘Connections’
- In the Web interface, from the main menu, select Connections
- Enter a port number where a serial device is attached in the ‘port’ field- Select direction of Data Flow
- Select ‘to: Device Port’ or ‘modem’ from the drop-down list
- In the 2nd ‘port’ field you have to enter the number of a device port. It’s the number of another SLC serial port where another serial device is attached. It will allow you to establish communication between these 2 ports.
- For the connection start you can select a trigger with a direction if needed.
- To save, click Apply.
E. Console Server
1. Services configuration
- In the Web interface, on the Service page, enable or disable SSH and Telnet logins.
- To save, click Apply.
2. Device port configuration (for all used serial ports)
- In the Web interface, on the Device Ports page, select a port where a device is attached and click the ‘configure’ button
- On the port settings page, choose the appropriate values for the Data Settings according to the device attached on this port.
- To save, click Apply.
You can now connect to port number x via SLC CLI with the following command:
connect direct deviceport x
[Originally Published On: 10/27/2006 04:35 PM]