LDAP with Active Directory on SLC, SLB and Spiders.
How can I configure my SLC, SLB or Spider for remote LDAP authentication with Active Directory support?
To configure a SLC & SLB or Spider for remote LDAP authentication with Active Directory support, follow the steps listed below.
SLC & SLB must have firmware version 5.2 or higher.
Spider must have firmware version 2.1 or higher.
In this example, the following settings will be used:
Domain: support.lantronix.com
LDAP Server Base DN: dc=support,dc=lantronix,dc=com
Bind Name: cn=administrator,cn=Users,dc=support,dc=lantronix,dc=com
SLC & SLB
To configure a SLC or SLB for LDAP authentication:
1. Log into the SLC or SLB's web manager with administrator privileges.
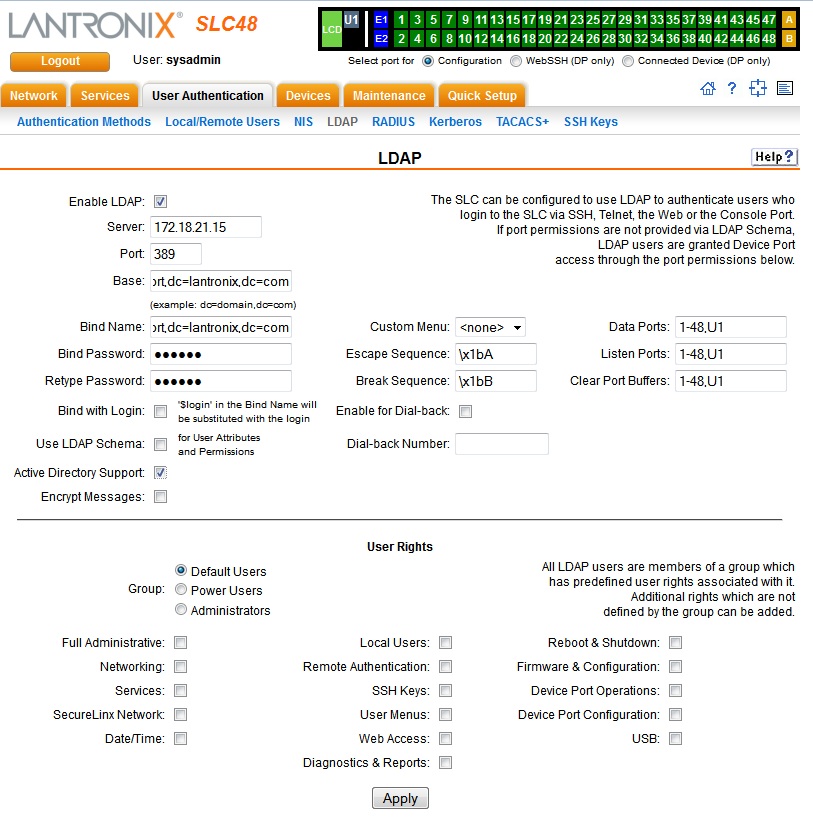
2. Click on LDAP link listed below 'User Authentication'
3. Enable LDAP checkbox, add server, port (if not using default port 389),Base(dc=support,dc=lantronix,dc=com),
BindName:(cn=administrator,cn=Users,dc=support,dc=lantronix,dc=com)
4. Type the Bind password
5. Retype password, enable Active Directory Support.
6. Select appropriate User Rights
7. Click Apply button.
8. Click on User Authentication link to select precedence of enabled methods.
9. Click Apply button to save changes.
Click the thumbnail below for a full size image:
Attempt to login to the SLC or SLB by using an Active Directory username and password.
Spider
To configure a Spider for LDAP authentication:
1. Log into the Spider's web manager with administrator privileges.
2. Click on User Accounts tab
3. Click on Authentication link
4. Select LDAP radio button
5. Add LDAP Server IP, LDAPServerBaseDN(dc=support,dc=lantronix,dc=com), LDAP Server Type - select Microsoft Active Directory, User Search Sub-filter -canbeleftblank,BindName-(cn=administrator,cn=Users,dc=support,dc=lantronix,dc=com)
6. Type bind Password
7. Retype password.
8. Click SAVE button
Click the thumbnail below for a full size image:

Individual remote users must be added to the Spider account prior to the Spider allowing remote users (LDAP, RADIUS) access.
7. In User Accounts tab, click on User/Group link.
8. Add Active Directory username. Although username/password will be remotely authenticated,
Spider will not allow the password field to be empty. Input any password such as "0000" (this should be different than actual AD password).
9. Group membership - select appropriate user rights.
10. Click create button.
Attempt to login to the Spider by using an Active Directory username and password.
[Originally Published On: 04/21/2008 11:27 AM]